The compressor from an older refrigerator is usually quiet, although not very powerful compared to industrial designs. But for airbrushing, tire inflation, blowing, painting auto parts, great. Such a compressor is necessary in any home or garage workshop. It gives 6-7 atmospheres, and more is usually not required. A homemade compressor has several advantages. Firstly, due to the quiet operation, and secondly, at cost. A self-made compressor from the refrigerator will cost an average of about a thousand rubles.
If you do everything right and take care of depreciation, then there will be almost no noise at all. For those who like to craft something with their own hands, and this usually happens at night, this moment is extremely important. details for modeling and other hobbies that are usually occupied after the main work. Therefore, noise restrictions are very important.
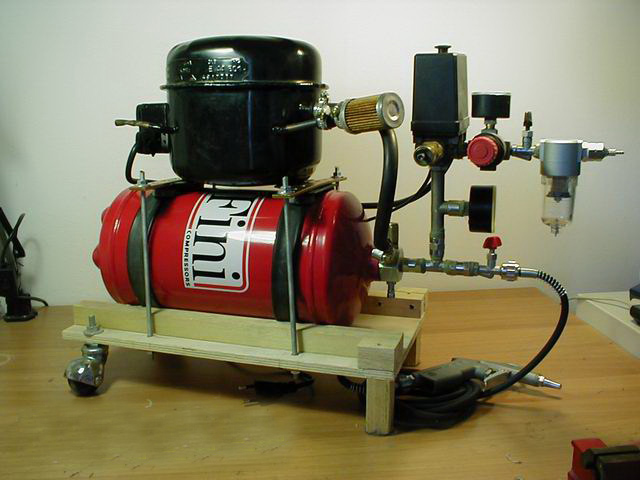
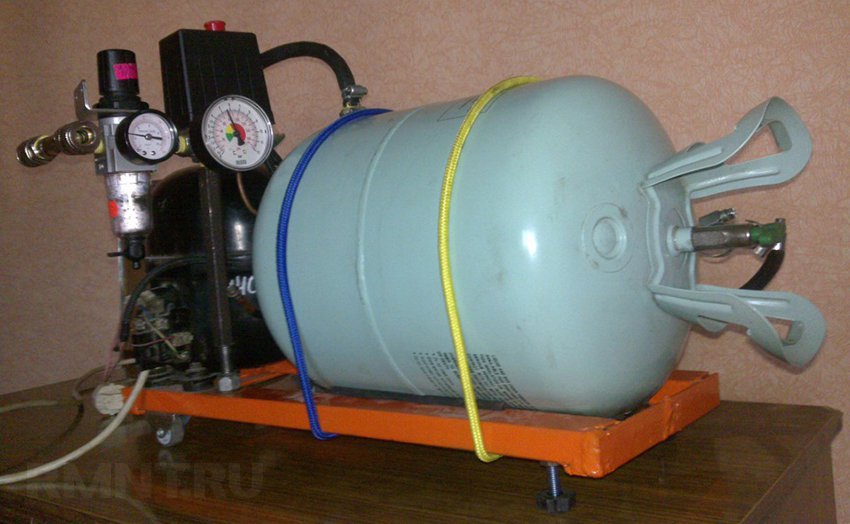
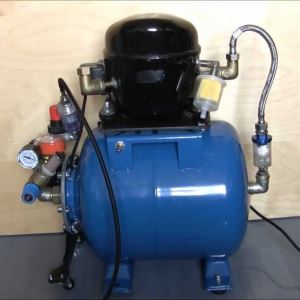
The design of the compressor from the refrigerator is extremely simple. A container for equalizing the pressure is attached to the compressor from the refrigerator, since direct airflow is not stable. This capacity acts as a receiver, air flow mixer.
What do you need to make a compressor yourself and where can all this be bought?

- Compressor from the refrigerator. You can unscrew from your old one, you can buy it in a repair shop that deals with refrigerators. In order not to get confused, we explain that the refrigerator motor is the compressor.
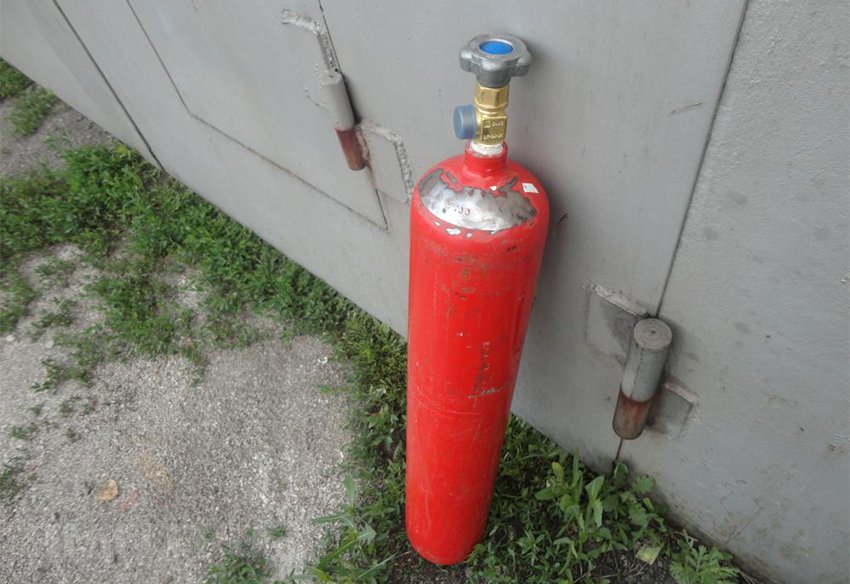
- Sealed container that holds pressure well. Receiver. Many use cylinders from fire extinguishers, but there are also plastic containers that are quite resistant to loads. It is important that the tank is of sufficient size to mix the air and equalize the pressure from the compressor of the refrigerator. You can make the receiver from a suitable plastic container from garden sprayers. If the container is plastic, an epoxy resin for fasteners will be required.
- Start protection relay. You can take it from the same refrigerator or buy it. But usually the motor and the relay are together, it is from the relay that the power cord with the plug goes.
- Gasoline filter, diesel filter.
- Pressure gauge. Sold at a plumbing store. Not a required but desirable part. Mounts on a metal receiver.
- FUM tape for connections.
- Three pieces of fuel hose. 2 by 10 centimeters and 1 about 70.
- A hose that will discharge air. You can attach a regular hose from the airbrush or a thicker hose, if the equipment will be used for painting cars.
- Clamps, mounts, electrical tape.
Some experience with your own hands is desirable.
Manufacturing process
 Most fuss will be with the receiver. If you use an old fire extinguisher as a receiver, be prepared for the fact that there will be a lot of metal work. In addition, it will be necessary to ensure tightness. If we do not have significant experience in metal work with our own hands, it is better to take a plastic receiver.
In the case of using heavy parts, one should mentally prepare for the fact that the compressor will turn out to be stationary. It is better to immediately prepare for it a reliable base and fasteners.
Compressor preparation
Determine where the compressor has a pipe for the incoming air flow and where the outgoing one. To do this, you can briefly plug the compressor into a power outlet and determine which duct blows air. Be sure to mark the tubes at the base so as not to mix up. This can be done with colored tape or a piece of medical plaster.
Gently cut the tubes to about 10cm. This is necessary for the convenience of connecting hoses.
The vertical position is important for the compressor. On the relay case there is an arrow pointing up.
It will be convenient if we fix the compressor in the correct position.
Receiver
Consider a simplified version with a plastic canister. We cut two holes for the tubes in the lid. The inlet tube must be made long, almost to the bottom. Outgoing can be made short, about 10cm.
Outside, small segments of about 2-3 cm remain.
The structure should be fixed with epoxy resin to ensure tightness.
In the case of an old fire extinguisher, the same actions will have to be done by soldering and welding the fittings.
But on the metal case you can install a pressure gauge.
Do not solder the parts tightly. It is better to weld nuts and cut threads where possible.
Connection parts
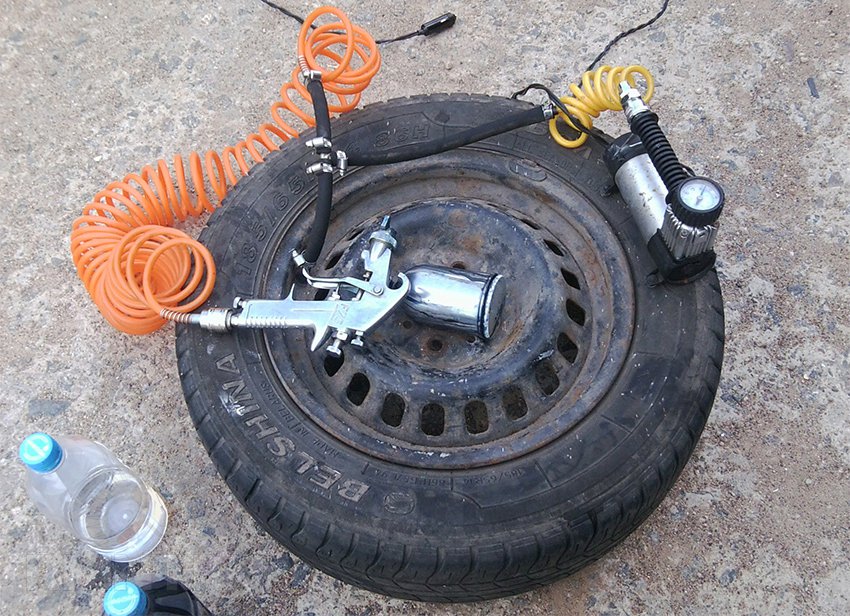
Fasten the gas filter to a short piece of fuel hose. Slide the other end onto the compressor inlet pipe. A filter is needed so that dust does not fall into the compressor.
With the second piece of the fuel hose, connect the compressor outlet pipe and the receiver's inlet tank. Air will flow from the compressor to the receiver. We put clamps on the hoses, because the air goes under pressure.
Another short length of fuel hose is needed to secure the diesel filter. A filter is needed to clean the air flow.
Hose and equipment can be attached to the outlet fitting.
Compressor service
Transformer or motor oil in the compressor must be changed periodically. It is advisable to change the gas filter approximately every six months. Replacing the filter is a routine maintenance understood by any motorist. All maintenance can be done with your own hands.
How to change oil
Inspect the motor. A sealed tube should leave the compressor of the refrigerator. Carefully cut and drain the engine oil. Usually there is about a glass there. However, if you purchased the compressor in the workshop, the oil is most likely already drained. Using a syringe, you need to pump in new oil and take care of how to close the hole. It will be most convenient to glue an external thread with an FUM tape and make a screw cap.
Compressor application
Mainly used for painting
- For airbrush painting. Airbrushing allows you to draw fine details and apply artistic images.
- For painting auto parts through a spray gun
- For quick painting during repairs. To do this, wheels must be attached to the compressor platform, like a vacuum cleaner. The accuracy of painting with a compressor is much higher, it is used in an elite interior design.
It is not necessary to buy a compressor for painting work or pumping up wheels - you can do it yourself from used parts and assemblies removed from old equipment. We will tell you about the designs that are assembled from improvised materials.
In order to make a compressor from used parts and assemblies, you need to be well prepared: study the circuit, find it on the farm or buy some parts. Consider several possible options for self-designing an air compressor.
Air compressor from refrigerator and fire extinguisher parts
This unit works almost silently. Consider the scheme of the future design and make a list of the necessary components and parts.
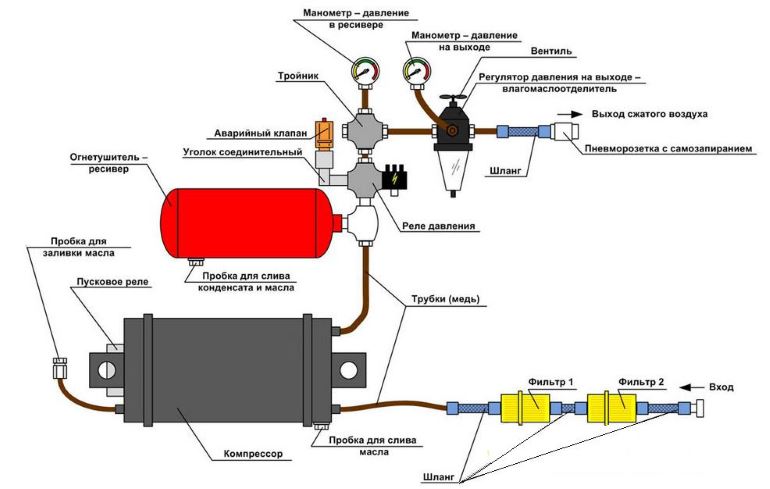
 1 - tube for filling oil; 2 - starting relay; 3 - compressor; 4 - copper tubes; 5 - hoses; 6 - diesel filter; 7 - gasoline filter; 8 - air inlet; 9 - pressure switch; 10 - a cross; 11 - safety valve; 12 - tee; 13 - receiver from a fire extinguisher; 14 - pressure reducer with pressure gauge; 15 - desiccant; 16 - pneumosocket
Necessary parts, materials and tools
The main elements are: a motor-compressor from the refrigerator (better than the production of the USSR) and a cylinder of a fire extinguisher, which will be used as a receiver. If they are not available, then the compressor from an idle refrigerator can be searched in repair shops or at metal collection points. A fire extinguisher can be purchased on the secondary market or involved in the search for acquaintances at work who may have written-off OHP, ORP, and 10-liter OS. Fire extinguisher cylinder must be emptied safely.
In addition, you will need:
- pressure gauge (as for a pump, water heater);
- diesel filter;
- filter for gasoline engine;
- pressure switch;
- electric toggle switch;
- pressure regulator (gear) with pressure gauge;
- reinforced hose;
- water bends, tees, adapters, fittings + clamps, hardware;
- materials for creating a frame - metal or wooden + furniture wheels;
- safety valve (to relieve excess pressure);
- self-locking pneumatic socket (for connecting, for example, to an airbrush).
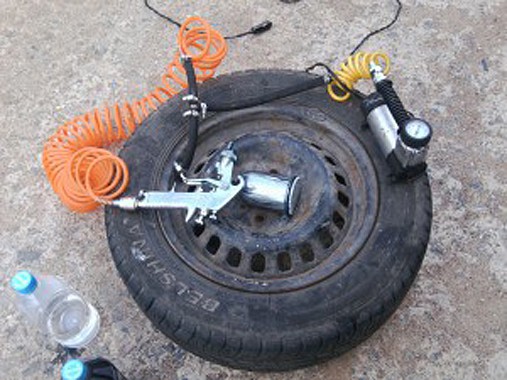
Another viable receiver came from a car tubeless wheel. Extremely budget, although not too productive model.
 Wheel receiver
About this experience, we suggest you watch a video from the author of the design.
A garage compressor is the right equipment in your garage. With it, you can paint the car, inflate tires, supply air for the operation of pneumatic tools.
For this, certain requirements are imposed on them in order to create the desired air flow with the required pressure. How to make a compressor in the garage, introduces the proposed article.
An air compressor in the garage is always needed. It can be used both to blow off dust from the surfaces of abrasive parts and to obtain excess pressure in pneumatic tools.
Often, the compressor’s working life is necessary for car painting, which imposes certain requirements on the created air flow:
- The flow should go strictly evenly without any impurities in the form of droplets of liquid, oil or suspended solids. On freshly applied paintwork, graininess, cavities and shagreen are due to the penetration of foreign particles into the air stream.
- Uneven flow of the mixture leads to drips of paint and the appearance of dull spots on the enamel.
- Branded air compressors manufactured by the industry have all the features for this process, but are quite expensive.
- Not inferior to professional ones, you can create a product model yourself or use a compressor for a garage from a refrigerator.
- In this case, in a device for containing compressed air, which is called a “receiver”, overpressure occurs. The air flow can be forced manually and mechanically.
- Manual feed saves money, but it takes a lot of energy and effort to control the process.
- These shortcomings are eliminated by automatic pumping, but in this case the oil is manually replaced in the air pump.
- Then the compressed air is evenly fed through the outlet fitting to the actuators.
How to make a simple compressor from the refrigerator
The simplest compressor in the garage can be made from an old refrigerator.
To make it, you will need to purchase:
- The air filter from the car, designed for different pressures. Its price is quite small.
- Bypass plumbing valve, which can be restrictive and disruptive, combined with a check valve for six atmospheres.
- Any plumbing hose withstanding more than six atmospheres.
- Chinese gun without pressure gauge.
- Any capacity storage tank. The larger it is, the less often it will need to be included.
- From copper tubes connecting communications or hoses of any formation.
Tip: The cylinder is a battery for storing air. As you work, the pressure will decrease, which is not very important when inflating tires, where no more than three atmospheres are enough. But for a pneumatic tool, this will be insufficient and critical.
Instructions for the manufacture of the device are as follows:
- The tank is going. At least three nozzles are included in its device:
- input;
- day off;
- to drain condensate. The element is installed after mounting the container strictly below, so that the liquid is drained without problems.
- The problem with the compressor may be that it will spit out oil, so it is necessary to close the outlet pipe so that it is directed strictly up.
- In the same direction the hose should go to the tank.
- The intake pipe is bent upward and supplied with a short rubber tube, an air filter from the machine is mounted on its end.
- A return bypass water valve is placed between the cylinder and the compressor, which prevents the air from escaping back, and is the simplest indicator that the pressure has become a given value. When it reaches six atmospheres, it will begin to hiss, which means it's time to turn off the compressor engine.
Tip: A conventional refrigeration unit produces more than 15 atmospheres, so you should not be afraid of the engine. You can additionally increase safety by screwing a valve at the outlet of the cylinder, a plumbing fit. When filling the cylinder, the valve can be blocked.
- It gets together.
- The cylinder is strengthened.
- After starting the compressor, air will accumulate until the bypass valve is activated, in this case, stop supplying it by turning off the engine.
Tip: When operating such a compressor, it is impossible to move away from the device in order to monitor safety when it is turned on.
The disadvantage of this device is:
- In case of jamming of the valve, if it does not work, the compressor will burn out or something will burst. Therefore, a pressure gauge should be installed.
- It is necessary for control - any automation can break. To do this, it is recommended to leave a check / bypass valve in the system.
The entire assembly will look like this:
- Through the pipe, which is equipped with a filter, the compressor takes air.
- The outlet hose going to the tank is equipped with a check / bypass valve.
- At the outlet of the tank there is a control valve, and after it a shut-off valve is installed.
- At the bottom of the tank there is a pipe through which condensate drains.
- A hose goes from the control valves to the gun.
- The pressure switch closes and opens the contacts used to power the compressor by electric current.
The photo shows a compressor assembly diagram from an older refrigerator model.

How to make a simple compressor for painting a car
To manufacture the device, you must purchase:
- Receiverwhich can be a car camera with or without a tire.
- Supercharger. For this, an automobile pump with a pressure gauge is used.
- Nipple from the old camera.
- Repair kit for rubber.
- Awl tailor.
After preparing the necessary materials, you can proceed to the manufacture of the device.
For this:
- An unnecessary car camera is checked for leaks by pumping it with a pump. If the air holds, you can perform the next step. In the presence of leaks, places of damage are sealed or vulcanized with crude rubber.
- In the prepared receiver, a hole is drilled to install an additional nipple through which a stream of compressed air will exit evenly.
- An additional fitting is glued in and connected to the spray gun.
- In the remote control, a nipple is twisted for a free exit of air flow.
- In the native nipple of the camera for a car, the nipple remains and will work instead of the valve, holding excess pressure.
- Empirically determined in the receiver the desired level of air pressure. In this case, paint should be sprayed onto any surface. The enamel should lie down evenly, without jerking. The pressure gauge determines the amount of overpressure.
Tip: The only condition when using the device is to ensure that moisture or dust do not get into the camera, and then into the spray gun. Otherwise, everything will have to be done anew.
How to make a compressor from a vacuum cleaner, refrigerator or other devices will tell the video in detail.
The compressor can be used in various fields - for tire inflation, airbrushing, painting of spare parts etc. Having the necessary tools and certain technical knowledge, it is quite possible to independently manufacture this unit on the basis of a conventional refrigerator. A homemade compressor gives about 7 atmospheres, which is quite enough for an ordinary garage workshop, so many more and more often think about how to make such a compressor? DIY compressor from the fridge it will turn out quite quiet and, most importantly, cheap in terms of cost.
On average, the production of this unit will require about one thousand rubles for all components.
Which is better - a homemade version or a professional device?
Before trying to make our compressor out of an old refrigerator, you need to compare these two options, i.e. a ready-made compressor sold in specialized stores, and our home-made option. You can highlight some key differences between them:
- The design of the factory compressor contains an electric motor that transmits torque to the working chamber through a belt drive. As for the home-made compressor, it consists of a body and the engine itself, without belts.
- In the factory version, automatic pressure relief systems, inlet and outlet filters, pressure gauges, etc. are already installed. In the compressor from the refrigerator, you will have to install the adjustment equipment yourself, taking into account all the features.
- Despite the fact that most factory compressors are equipped with automatic systems, in some budget models this feature is not implemented. In other words, these units will have to be turned off on their own, noting the time by the clock. Homemade compressors are mainly equipped with a protective relay that turns off the engine when there is a risk of overheating.
- Some factory models may completely lack any grease. Of course, their motor resources are small, but there are no different exhausts. This circumstance is very important, especially if the airbrush behaves rather capriciously, not tolerating various impurities. As for homemade compressors, there is plenty of this oil. By the way, you need to pay attention to what kind of oil to pour - synthetics are very poorly combined with ordinary, so you do not need to pour anything that is horrible.
- The main feature of a homemade compressor is that it works very quietly, especially if you put all the pipes on it correctly, observing tightness. As for factory compressors, they behave more noisily, so its use is possible only outside the house.
- The cost of manufacturing a homemade compressor is very low, because we take the main components from old equipment, and the adjustment equipment will cost us one thousand rubles. As for the factory compressor, then the situation is different.
- It is not possible to make any technical changes to the factory compressor. In other words, if the unit is not powerful enough, then it can only be used as a pump for, no more. Homemade options are good in that you can add some details to them, for example, a large receiver, so you can significantly increase the power of the device.
- The factory compressor is a complete technical device, so any improvisation with it is impossible. With a home-made unit, you can do almost everything - bring some parts out of the case, or hide everything in one box, and attach a handle on top for easy transportation.
- You can install a fan on a makeshift compressor to cool the device from the outside.
Most refrigeration compressors have some limitations in terms of their work. In total, several modes are shared:
- Normal is from 16 to 32 0 C.
- Subnormal - from 10 to 32 0 C.
- Tropical - from 18 to 43 0 C.
- Subtropical - from 18 to 38 0 C.
However, combined modes are more common, having a different range.
So a homemade compressor can be much more effective than factory, in terms of working with air.
In the video, a version of a homemade compressor for pumping wheels
Dismantling work
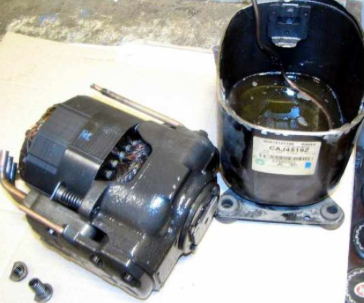
To make a home-made compressor from the refrigerator, you need to make initial preparations. It consists in certain dismantling works, i.e. we just need to remove the compressor from the refrigerator itself. It is located behind the refrigerator, in its lower part. To remove, we need an elementary set of tools: pliers, ring spanners and two screwdrivers (plus and minus).
On the compressor are located between the tubes that are connected to the cooling system. These tubes must be bitten off using pliers, but in no case should they be sawed off with a hacksaw. The fact is that with this method, small chips will inevitably form, which can get inside the compensator.
Then we proceed to the removal of the start relay - this is an ordinary black box with wires protruding from it. We unscrew the fasteners, then we bite the wires that lead to the plug. We must not forget to mark the top and bottom of the start relay - this is useful to us in the future. By the way, we also take away all the fasteners together with the unit itself.
Health Check
After we removed the compressor, it is necessary check its performance.
The fact is that we are removing the device from the old refrigerator, so you need to make sure that our unit is still “alive”. So, we flatten the tubes with pliers - this is necessary so that the air flow passes through them. Next, we need to put the start relay in the position in which it stood in the design of the refrigerator. This is very important, because in the wrong position there is a risk of breakdown of the device, as well as failure of the compressor winding.
On the relay case there are wires to which you need to screw a piece of wire with a plug. It is better to wrap the connection area with electrical tape to eliminate the risk of electric shock. Plug the device into a power outlet. If you did everything correctly, then the compressor will work, and air will flow from its tubes. By the way, it is necessary to mark which tube the air stream leaves and which one goes.
Step-by-step instruction
Before embarking on self-production, you need to make sure that you have all the necessary materials and tools.
We offer you to watch a video with a detailed description of the process of one of the manufacturing options
In addition to the compressor itself, which we previously removed from the refrigerator, we will need:
- Receiver. In this case, you can use the body of the old fire extinguisher, or weld the body of sheet metal and pipe.
- Various hoses. At the same time, the length of one hose should be at least 600 mm, and the other two should be about 100 mm. In this case, you can take the hoses from the car.
- Various consumables - gasoline and diesel filters, wire, clamps, pressure gauge and epoxy.
- Associated tools, i.e. screwdrivers, pliers, drills, etc.
- In addition, we need a regular wooden board, which will be the basis of the entire structure. We attach the compressor to it using ordinary screws. Mounting should be carried out exactly in the same position that he occupied in the design of the refrigerator.
We take any plastic container of a suitable volume (from 3 liters or more). In the upper part you need to drill a couple of holes for the size of the output tubes. We insert the tubes, and then fill everything with epoxy. The inlet tube, into which the air enters, should be located so that from its end to the bottom of the receiver is about 200 mm. The output tube should be immersed in ten centimeters.
This is a description of a plastic receiver, but for better tightness it is best to make the receiver in an iron case. In this case, there is no need to fill everything with resin, and the hoses are simply welded. In addition, only on an iron receiver can a manometer be installed.
To install it, you need to drill a hole for the nut on the receiver. We insert it, and then brew it. Only then screw the pressure gauge into this nut, after which the work is completed. Now we attach the receiver to our base using wire. The scheme will be approximately as follows:

Our homemade unit is almost ready.
On the Internet there are a lot of photos and videos of his work, for example, it is shown how he is used to paint various spare parts, so the expediency of its manufacture is quite obvious. In conclusion, we need to add a few extra touches to our device.
You must take one of the hoses, whose length is ten centimeters, and put it on the filter. If this happens with difficulty, then you can slightly heat the end of the hose so that it is easier to put on the fitting. The second end of the hose is put on the inlet of our device. In this case, the filter will protect against dust entering the housing. The second 10-centimeter hose must connect the inlet of the receiver and the outlet of the compressor. In this case, it is better to tighten the joints with clamps. Our third hose should be put on the diesel filter, and the other end to insert the outlet of the receiver. At the same time, the free filter nozzle will subsequently be connected to various equipment for airbrushing, spray guns for painting, etc.
Another video on the topic
Some technical data and service features
It is quite difficult to say unequivocally which pressure a particular compressor will show. Here a lot depends on the specific brand and the operational life of the device itself. By the way, old units show even greater performance than modern ones.
Maintenance of our home-made device is a very important point in operation.
The main work will be to replace diesel and gasoline filters, as well as to replace the oil in the device. As a rule, three copper tubes are present in the compressor design. We used two of them earlier, and the third remained untouched. It is the shortest and sealed at the end. So, oil is drained through it. To do this, it is necessary to cut off the sealed part, and then merge the treatment. The filling is done through it.
Do I need to repair the compressor?
Repair will consist in ringing the relay, as well as in changing the oil in the device. If the manipulations did not help, then there is absolutely no need to invent anything else. It is best to throw out the old appliance, and then make a new one. Moreover, the issue price is not more than 1000-1500 rubles.
Conclusion
In principle, we figured out how to make a compressor out of the refrigerator.
The feasibility of its manufacture is difficult to overestimate, because with the help of this device it is possible to carry out various work on airbrushing, painting various components and other works requiring pressure.
An additional advantage is that such a device can be used at home, because it emits little noise. In fact, this is the same refrigerator, only without unnecessary parts of the case.
Small-sized compressor - a thing very necessary for a garage or personal workshop. It is used to solve many problems.
For painting with a spray gun and applying a layer of glue on large surfaces, for artwork with an airbrush, for blowing dust from a workplace or just for pumping tires ...
At the same time, the need for this unit for many is not one-time, but episodic in nature. Therefore, if you, for example, are not an airbrush artist, buying an industrial compress is simply unprofitable.
However, having certain masterful skills, it is not difficult to make such a device yourself. In this article we will tell you how to make a master compressor from the refrigerator.
There are many examples of such artifacts of technical creativity. Just dial the appropriate request and see the photos on the Internet. To build a compressor from a refrigerator with your own hands, you must first understand what is common in all these designs.
What structural elements and why do they contain? Of course, the question whether you possess the necessary craftsmanship or not is not even discussed here. Of course you have!
All these structural elements can be very conditionally divided into basic and additional. “Conditionally” - because it all depends on the purposes for which you will use the compressor.
If just to inflate the tires of a car, then only one compressor is practically enough. Although in this case it must be fixed on some basis.
Perhaps it is better to install this base on wheels in order to more conveniently move the compressor around the garage. It will be necessary to provide it with inlet and outlet pipes, air filters on them.
It is necessary to put a pressure gauge at the outlet and consider the reliable fastening of the hose-duct.
Important! But if you work with an airbrush, then the most important thing for you is the stability of the air flow. Therefore, you will inevitably have to install a receiver in the system.
A receiver is, roughly speaking, a cylinder into which air is supplied from a compressor. And already from this cylinder, it is consumed as necessary.
Here it is already necessary to clearly understand what air pressure you are going to work with. The operating pressure of the compressor of a typical refrigerator is 15-20 atmospheres. Although it’s better to clarify the documents on the unit ... 3 atmospheres are enough to inflate tires.
Interesting! To solve most of the remaining tasks, 6-8 atmospheres are enough.
Unless you are going to work with some particularly powerful pneumatic tool. But in this case, for example, for a jackhammer, 20 atmospheres may not be enough.
That is, when installing a receiver in the system, you need to think about two things:
- What pressure limit is it designed for? Of course, the ultimate pressure must be higher than the working one! For example, a receiver from a carbon dioxide fire extinguisher cylinder was originally designed for the highest working pressure of 15 MPa or 148.04 atmospheres. For a cylinder of a powder fire extinguisher, for example OP-8, this will be 15, 79 atmospheres. At the same pressure, a receiver from a cylinder for household liquefied gas can also work. And the receiver from the KAMAZ brake system works in 16 atmospheres. These are proven options. It is more difficult with home-made or theoretically not designed to work with high pressure tanks.
- How will the receiver be protected from overpressure in it? There are two possible options. The first is the discharge of excess pressure into the surrounding atmosphere using a bypass valve. The second is the automatic shutdown of the compressor.
All these are the main points that you need to think about when thinking about how to make a compressor.
In order not to "everything like clockwork" ...
The main difference between a refrigerator compressor and industrial compressors: it was originally designed to work in closed system. Therefore, he literally bathes in oil!
The oil is mixed with freon, freon and oil, then separated, then mixed again ... That is, the lubrication system in the compressor of the refrigerator is in no way isolated from the flow of the main reagent that this compressor pumps!
Therefore, when you start pumping air with this compressor, oil will inevitably spray from the outlet pipe. The first thing to do: make this pipe in the form of an inverted letter "G".
At the top, in front of the second L-shaped bend, behind which the receiver is located, an oil filter is installed.
In it, just below the middle, a conical plate directed with the point up is installed. Gaps are left between the plate and the walls of the chamber. The air flow from the compressor, falling into the chamber from below, is inhibited on the conical plate and the drops of oil that it carries with it roll back down.
Important! Although it must be understood that the microparticles of oil and moisture in this air stream still remain. Therefore, firstly, do not even think of “clogging” air with this compressor into the scuba tanks!
And secondly, the receiver will gradually fill up at the bottom with oil-water condensate. In order to prevent the system from being unwound every time, it is better to provide a drain hole in the bottom of your supposedly fire extinguisher.
Next is a matter of fantasy
Anyone who once drove “for power” on a moped or motorcycle without an air filter knows what deep scratches this, apparently “clean air” leaves on the piston skirts and cylinder walls.
Therefore, thinking about how to make a compressor yourself, you should inevitably think about an air filter at the inlet. It is enough to make an inlet pipe for the inner diameter of the automobile air filter.
 It must be done in the form of the same inverted letter "G" to avoid splashing the oil out. Of course, it is necessary to make a seal in order to prevent air inflow from below. Surely there is something suitable for this in the corner of your garage?
... So, let's trace the air path through the compressor we create. Through the air filter from the car and the inlet pipe, air enters the "pump".
Leaving through another branch pipe already under pressure, the air gets rid of oil dust in the oil sump and oil filter. Further air enters the receiver.
It should be noted that air must pass through the receiver in order to dampen pressure surges. Therefore, if you simply screw a tee into the neck of your fire extinguisher - on the input, output and pressure gauge - this will not give any result.
Ideally, this circuit looks like this. Air enters almost to the bottom of your fire extinguisher through one of the two longer pipes - and exits through the second, shorter one. Between the inlet and outlet, there is a third one in which a pressure gauge is screwed in, showing the air pressure in your fire extinguisher.
In parallel with the pressure gauge, a bypass valve or relay is included in the circuit. There are manometers that combine the option of a relay. Further, from the outlet of the receiver, air enters a hose capable of withstanding a pressure of 6-8 atmospheres for use.
When changing the tool connected to the compressor frequently, it is reasonable to install a special pneumatic lock connector at the end of the hose. It allows you to connect and disconnect a tool with one simple movement of your fingers.
Interesting! If you only work with one thing each time, then you can get by with the usual ball valve in front of the hose. In the same way - it’s convenient, useful, but not included in the “necessary package”, - a second pressure gauge showing the pressure in the hose.
As already mentioned, this is the necessary level of configuration. These are the tasks that need to be solved if you decide to build a compressor for your workshop yourself. Further, it is only a matter of the master’s imagination.
You can, for example, install a cooler for cooling. It is no secret that the air heats up during compression. It is possible, instead of an automobile air filter at the inlet, to put water, according to the principle of a hookah.
You can install two in series - instead of one receiver. Or make a salt filter, drain the exhaust air ... For each purpose - its own means.


The best material for car trim
Principles of hardening the body
Do-it-yourself compressor - with minimal scrap costs
Which is better: do-it-yourself or factory-made compressor for painting a car
Causes of fuel pump malfunctions