Many craftsmen know that you can make a compressor from the refrigerator with your own hands! Can . But, few people know how to do this! In this article, we will try to provide a comprehensive answer on how to make a compressor yourself, so that everyone can create this equipment at home.
After all, if you look, then in fact the issue needs an air compressor in every garage. With the help of a compressor, you can pump up the wheels without visiting a service station or tire fitting, supply air to a working pneumatic tool, or simply blow dust off the work surface. So, consider the installation option for painting.
Factory or homemade compressor
In relation to the station for painting there is a list of certain requirements. The main condition is the need for a uniform intake of air, without any impurities. Among the standard defects that are due to the presence of foreign particles include granularity, shagreen leather or caverns on an enamel coating. In the event of an uneven flow of paint, drips or dull heels may form.
Of course, if you pay attention to branded air compressors, then such installations are equipped with all the necessary functions for high-quality airbrush operation. The only drawback of such units is their cost.
To save money and at the same time create a functional model that will not be inferior to professional equipment, you need to familiarize yourself with the theoretical information base or watch the video material on the topic “compressor for painting a car with your own hands”.
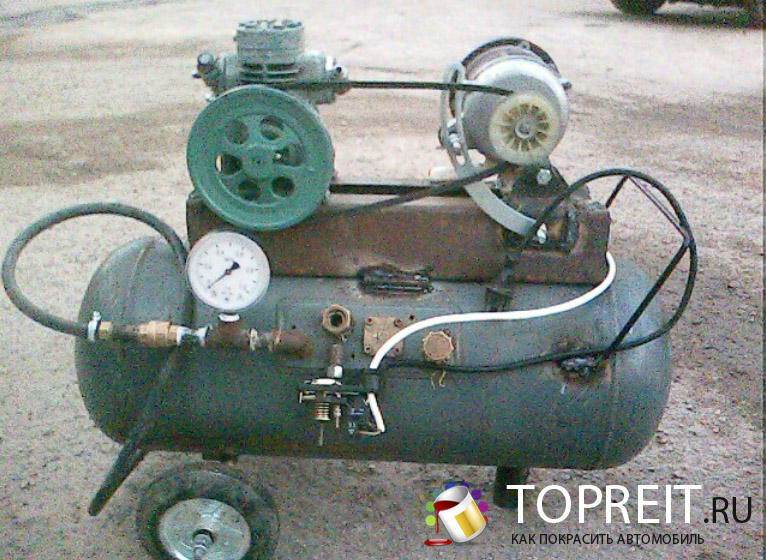
The principle of operation of any model, regardless of whether it is homemade or factory, is the same. Excessive pressure builds up in the tank. The method of air injection is different (manual, mechanical). In the case of manual feed, significant savings are made, but a lot of energy is spent. After all, the process requires constant monitoring.
Automatic pumping avoids these drawbacks, except that the oil for the air compressor requires periodic replacement. Thus, a uniform air supply to the switchgear occurs. In theory, it looks extremely simple, so create an efficient compressor station, possibly in a short time.
Do it yourself
So, we choose the manufacture of the installation for painting from a conventional car camera. The list of necessary material:
- Car camera acting as a receiver;
- Pump with pressure gauge, acting as a supercharger;
- Chamber nipple;
- Repair kit;
- The usual awl.
Now you can start manufacturing a compressor station. The camera must be checked for leaks, for this it needs to be pumped. If there are air leaks, it is necessary to solve this problem, either by gluing, or by vulcanization with crude rubber.
Then, in the manufactured receiver using an awl, you need to make a hole. A nipple will be placed here, through which a uniform stream of compressed air will exit.
An additional fitting is attached by gluing. Repair kit will help in solving this problem. Then the fitting is connected to the spray gun. To check how air flows out, unscrew the nipple.
In this case, the native nipple remains, it will serve as a valve, and hold excessive pressure. In the end, you need to determine the level of pressure by spraying paint on a metal surface. If the enamel lies evenly, then the installation works well.
In addition, the pressure can be checked with a pressure gauge. But, its level even after pressing the aerator key should not be spasmodic.
It is not difficult to construct a compressor, but after its manufacture, anyone can make sure that repairing or painting the car will become much more effective than it was with the spray can.
Among the last parting words should be attributed to the fact that it is necessary to avoid getting water or dust in the car chamber. So that these particles do not subsequently get into the spray gun, otherwise you will have to re-paint.
As a result of proper operation, the created installation will work for a long time, but it is better to automate the pumping of air.
Semi-professional air blower
Experts have repeatedly made reviews that homemade compressor units have a longer service life. Moreover, the comparison was made with domestic and foreign models.
This, of course, because the installation is done with your own hands. Therefore, we will consider the option of how to make a compressor from a refrigerator, which will not be inferior even to products of eminent firms. So, for its manufacture is necessary, the following list of materials:
- Receiver for compressor;
- Pressure gauge;
- Relays for monitoring the pressure in the compressor;
- Threaded adapters;
- Fuel filter (gasoline);
- Gearbox with oil and water separating filter;
- Water pipe cross with ¾ inch thread;
- Motor for compressor installation;
- Car clamps;
- Engine oil (10W40);
- Switch (220 V);
- Oil resistant hose;
- Brass tubes;
- Ordinary syringe;
- Thick board;
- Compressor rust converter;
- Power system filter (diesel);
- Paint for metal;
- Nuts, washers, studs;
- Wheels for furniture;
- Sealant, tape fum;
- Needle file.
Working mechanism
To simplify the procedure, the engine can be a compressor from an old Soviet-style refrigeration unit. There is one positive point, namely the presence of a compressor start relay.
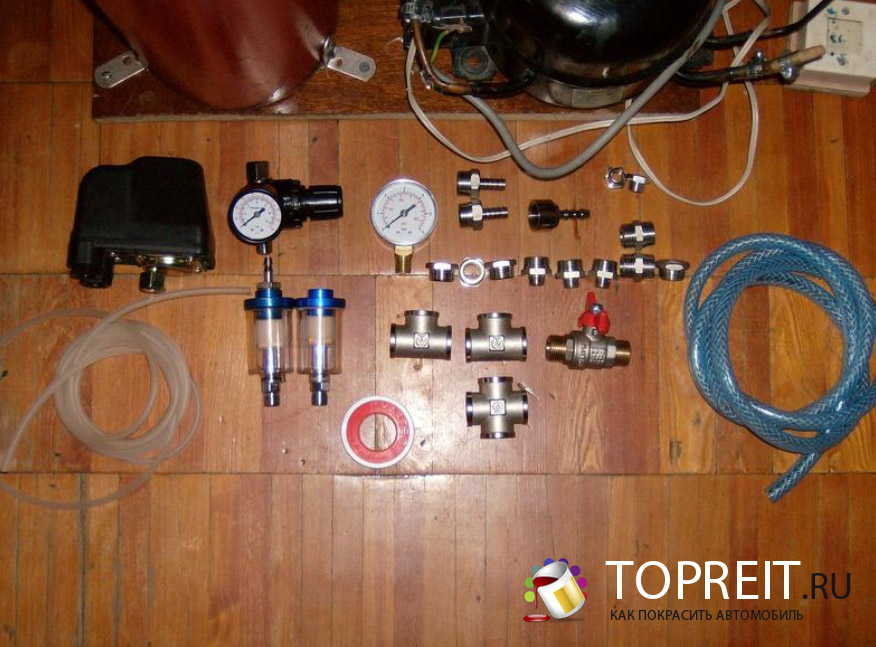
Soviet models surpass their foreign competitors by generating higher pressure. After removing the executive unit, it is necessary to put it in order, freeing it from layered rust.
A rust converter will help treat the compressor to avoid further oxidation. Thus, the working motor housing will be prepared for subsequent painting.
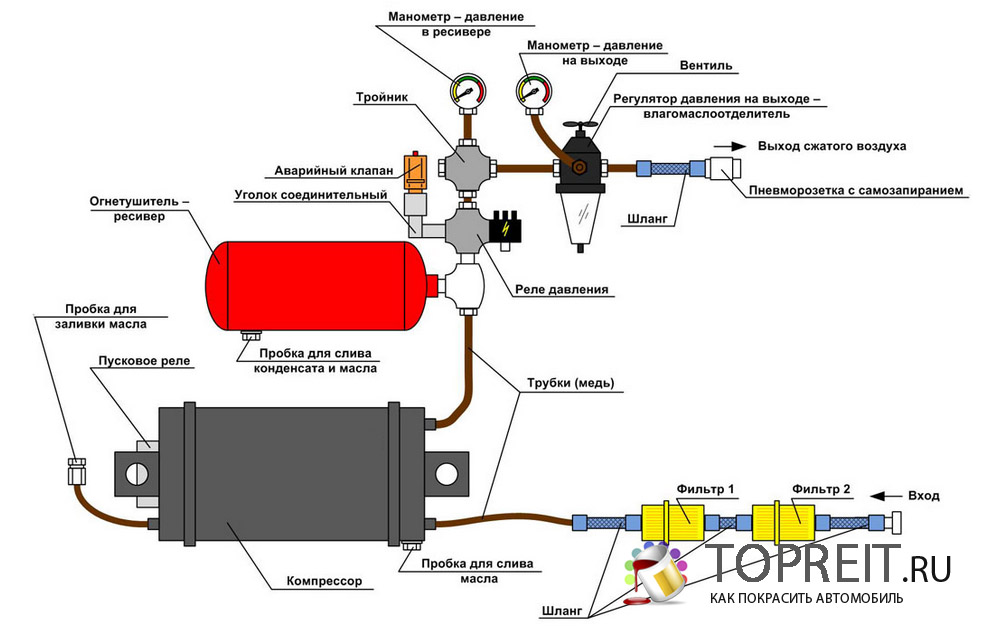
Installation diagram
After completing the introductory part, you can begin to change the oil. After all, if you do not cheat, then it’s not enough which refrigerator managed to undergo regular maintenance or oil changes. However, such a course of events is also quite justified, because in this case the system is completely isolated from atmospheric exposure.
So, semi-synthetic oil is quite suitable for this procedure. Moreover, it is no worse than compressor oil, and has a sufficient amount of useful additives.
We go further and find 3 tubes on the compressor, 2 of which are open, one is sealed. In our case, open tubes will be used for air circulation (inlet and outlet). To understand how air moves, you need to briefly energize the compressor. Then remember or record which duct draws in air and which, on the contrary, releases.
The purpose of a sealed tube is a routine oil change. Therefore, the closed end should be removed. This will help us with the file, which needs to be made filed around the tube. It should be ensured that the chips do not get into the compressor.
After that, it is necessary to break off the end of the tube and drain the oil into any container in order to establish its volume for subsequent replacement. Then we take a syringe and fill in the semi-synthetics, but in a larger volume than it was merged.
When the oil is filled, the engine lubrication system must be shut off. This can be done by selecting a screw, after which this screw is wrapped with fum tape and twisted into a tube. It's time to remind you that oil droplets will sometimes leak out of the exhaust air tube of the supercharger.
Therefore, an oil and water separator for the compressor will come to the rescue.
When the indicated work is completed, it's time to start assembling the installation. You need to start by strengthening the engine with a start relay on a wooden base, so that it is in the same position as it was on the frame.
This is necessary because of the sensitivity of the compressor relay to the spatial position. To determine more precisely, an arrow should be drawn on the top cover. It is important to maintain accuracy, because the correct switching of modes will depend on the installation of the compressor.
Capacity for air
An excellent solution to the problem would be cylinders from fire extinguishers. It depends on their ability to withstand high pressure, in addition, the cylinders have a significant margin of safety, are excellent as attachments.
So, let's take the OU-10 fire extinguisher as a basis. Its working volume is 10 liters. According to the technical characteristics, the cylinder withstands pressure - 15 MPa. Now you need to unscrew the locking-starting device from our workpiece, and then screw the adapter.
In this case, if traces of corrosion are detected, they must be removed with a rust converter. Of course, external removal is not difficult, but internally it will require patience. Therefore, we fill the converter inside the container, and shake the contents.
After cleaning, you can screw in the water crosspiece. Thus, two working parts of our compressor unit were prepared.
Assembly of parts
To make it easier to store and move work parts, it is best to place them on one base. As already mentioned, a wooden board is needed, which will serve as the basis for reliable fastening of the engine, as well as the body of the fire extinguisher.
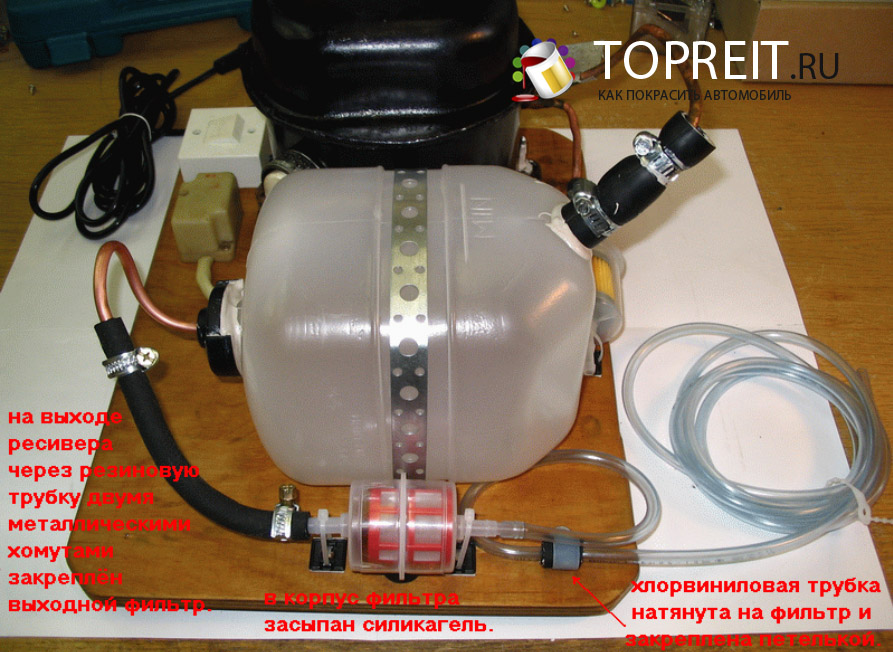
Therefore, as an engine mount, we will use threaded rods that need to be threaded into pre-drilled holes. Of course, plus everything you need and nuts (washers).
Then you need to place the receiver in an upright position, 3 sheets of plywood will come in handy here. In this case, in one sheet you need to make a hole for the cylinder. The remaining sheets are attached with screws to the main board and glued to the sheet that holds the receiver.
But, on the eve it is still necessary to hollow a recess under the bottom of the receiver in a wooden base. And finally, for the design to be maneuverable, you need to screw the furniture wheels to its base.
After all that has been done, you need to protect the system from possible dust. A gasoline fuel filter will come to the rescue. It will perform the function of an air intake.
It will involve a rubber hose and a blower inlet pipe. It should be noted that at the inlet of the compressor station there is low pressure, which means that contact enhancement with the help of automobile clamps is not necessary.
Thus, we have created an inlet filter for the compressor installation. At the outlet of the station you need to install an oil separator that will block the ingress of water particles. The power supply filter will be used here. Due to the fact that the pressure at the outlet of the compressor station is increased, automobile clamps will be used from this place.
So, the turn came to the oil and water separation filter. In this case, it must be connected to the input of the gearbox, which is needed to decouple the tank and the pressure output of the supercharger. So, we screw the exit into the previously prepared cross on the left side, and on the right we screw the manometer, thanks to which we can control the balloon pressure. At the top of the crosspiece you need to screw in the adjustment relay.
The presence of an adjustment relay will make it possible to set the receiver pressure range, as well as to interrupt the power circuit in the supercharger in time. When it comes to the actuator, it is recommended to use PM5 (RDM5).
Using these devices, the compressor will turn on, in case of a drop in air pressure in the tank below the set mark and turn off if the specified parameters are exceeded.
The desired pressure is adjusted to the relay using two springs. The function of a large spring is to create a minimum pressure, while a small spring is responsible for regulating the upper limit, actually setting the shutdown limit of the compressor unit.
PM5 (RDM5) was primarily produced for use in the water supply network; in fact, these are ordinary two-contact switches. In our case, one contact is used to connect the 220 V network to zero, while the second contact is used to connect to the supercharger.
We carry out the phase of the network through the toggle switch to connect to the second input of the compressor station. If there is a toggle switch in the electrical circuit, we will be able to quickly disconnect the system from the network, which will save us from running around towards the outlet.
Naturally, all compounds must be soldered and carefully insulated. After that, you can paint the finished installation and conduct test tests.
Adjust the pressure
So, after the assembly of the structure, it is quite natural to conduct its verification. To do this, you need to connect a spray gun, or as an option a pneumatic gun. Then, not including the toggle switch, we connect the plug to the network.
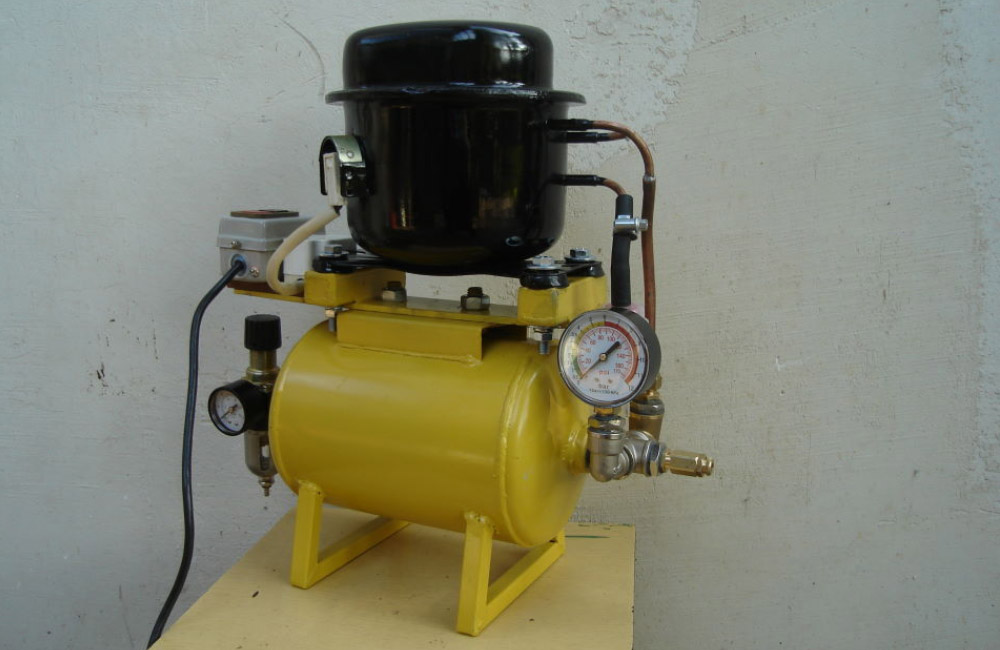
We set the control relay at minimum pressure and supply power to the supercharger. Do not forget the pressure gauge, which allows you to control the pressure in the tank. After we were able to make sure that the relay turns off the engine, we need to check the tightness of the connections.
A classic soap solution can help here. If the system has passed a leak test, you can bleed any remaining air from the tank chamber. It should be noted that in the event of a pressure drop below the set limits, the relay must start the compressor. If all systems are in good working order, it is possible to start painting any part.
At the same time, you should not load yourself with preliminary metal processing. It is important for us to set the pressure necessary for painting the product.
Such experimentation will give us the opportunity to determine the atmospheric value so that the color of any product occurs in a uniform layer. In addition, it is very important that this entire process occurs with a minimum amount of blower operation.
Thus, we can summarize. Making an automobile compressor, a lifting lesson for every motorist.
Of course, it is difficult to argue that the second version is more complicated and will take more time to manufacture, but thanks to the automatic pressure control system and the presence of a supercharger start, working with such equipment will be one complete pleasure.
In addition, you will no longer need to control the receiver’s camera. Such a station will allow painting a car, a fence in a village or a garage door.
For continuous operation of the created compressor, it will be necessary to conduct periodic routine maintenance . To drain the oil, you can use a syringe. In this case, we unscrew the filler hole, put the hose on the tube and pump out the working out. Also, fresh oil can be pumped with a syringe. Filters are changed as necessary, including in the event of a decrease in speed for filling the tank chamber.
Make or buy
Today, the market is filled with a variety of compressor equipment. There are piston units, vibration units, screw stations and other devices that are manufactured for different purposes. Ready-made installations can be purchased at auto parts stores or on specialized sites.
A large assortment can make it difficult to choose the right product. But be that as it may, if you decide to buy a finished station, focus on the study of technical parameters, cost and reviews.
To obtain a quality guarantee, it is better to purchase equipment of well-known brands, however, an expensive product will pay off in the case of a professional car repair profession. Little-known products can let you down, so it’s best not to risk it.
Often low-cost materials are installed in budget options. There are frequent cases of plant failure due to instant breakdowns of individual parts, while warranty repairs will take a lot of time.
As already mentioned, hand-assembly is often more reliable than the factory. A separate plus are the technical parameters. For example, according to statistics, compressors from refrigerators have been used for decades. Regarding a fire extinguisher, we can say that this product has a ten-fold safety factor.
Therefore, it is better not to buy what you are unsure of. In addition, having studied the current material, you know that you can make a compressor yourself, even in a domestic environment. A well-made device will be the envy of neighbors in the garage.
Another story
Let's start with the design of the technical requirements for the fruit of hand-made engineering. Let's say that it all started with the purchase of a new double-action airbrush. Therefore, the issue of manufacturing a compressor unit with a receiver became extremely necessary.
The double-acting airbrush has the ability to control the air flow, as well as to lock it and open the air duct. In Europe, such a device is used with a separate cylinder for compressed air. So, the compressor with the reservoir serves as a container for collecting air, and the airbrush uses this air.
Of course, the main component is the compressor. Here an old refrigerator will come to the rescue, from which you can remove an excellent compressor. To do this, you can go to sites that sell refrigeration equipment.
We determine the price and order delivery, but before that you need to write down the name of the manufacturer’s company and visit the site. So, in our case, the manufacturer is Danfoss. On the website of the company we download the technical description of the compressor.
Next, we consider such an option as a do-it-yourself compressor receiver. Here, of course, we need a tank that was made to contain gases or can withstand high pressure. Optimally, if such a capacity meets the requirements of GOST. Therefore, we immediately exclude containers, like a plastic canister or bottle. Consider the options for tanks:
- Carbon dioxide fire extinguisher. Withstands pressure - 10 atmospheres. Capacity - 3 L / 5 L / 10 L. Cons - metric thread at the entrance.
- Accumulator Good capacity with low working pressure. Convenient thread at the entrance. Cons - needs to be fine-tuned, as it is internally divided into a membrane that contains carbon dioxide. The membrane needs to be removed.
- Oxygen balloon. Withstands high pressure. Cons - only extremely heavy models are available.
- Propane tank. It is generally similar to a fire extinguisher, but the manufacturer does not recommend their use for compressed air.
Connecting links
After we have decided on the compressor, and have chosen a suitable product for the receiver, the next step will be to combine them. In addition, it is necessary to solve the problem of air flow to the airbrush.
You can start from a site that attaches directly to the receiver, and will provide air distribution. It must be recalled that the key factor is its compatibility with the receiver connector. Next, we draw attention to the pressure switch, which will ensure that the compressor is turned off and on.
The best option for the relay is RDM-5, which is used for plumbing systems. This model is widely available for sale, and is good in that its connecting element is designed for an external inch thread.
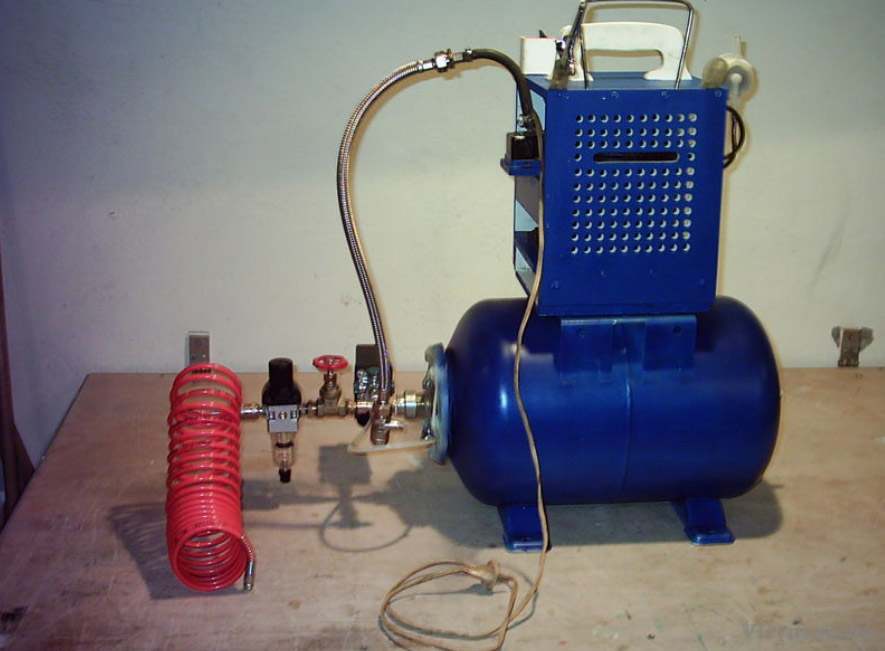
Then we determine the pressure indication in the receiver. For this we need a manometer for 10 atmospheres, it also has a suitable connecting size. And we will also need a static device.
Next, we deal with the air preparation unit. Pressure must be applied to the hose that leads to the airbrush. Accordingly, there is a need for a gearbox with a pressure control limit of up to 10 atmospheres, and it is desirable that a pressure gauge and an oil separator filter be attached to it.
Using a manometer, we will control the pressure, and the filter will ensure that no particles of compressor oil get from the receiver. But, do not confuse the filter with a lubricator that performs a diametrically opposite function.
We will continue collecting materials, and it's time to prepare fittings, turns, tees. We take an inch as the base size. To determine the quantity, you need a diagram of the air distribution and preparation unit.
We will also need external and internal adapters. If desired, you can make a plan diagram of how to make a compressor. The next stage is the placement of the finished structure. Alternatively, chipboard boards may be suitable.
Of course, in order not to swear at the station while moving the station around the workshop, it is advisable to immediately resolve the issue with the roller legs. Any furniture store will gladly sell them to you. To save space, you can make a two-story structure. True, long bolts may be needed. So, we summarize the planning stage, with a list of components:
- Compressor;
- Receiver;
- Pressure switch;
- Pressure gauge;
- Filter reducer;
- Emergency valve;
- Fittings, adapters;
- Plumbing gaskets, fum tape, sealant;
- Cables, switch, plug;
- Flexible oil resistant hose;
- Particleboard
- Legs rollers, bolts, nuts, washers and tools.
Start assembly
It would be ideal to dismantle the extinguisher assembly and weld the adapter fitting. An alternative way is to unscrew a part of the valve, leaving internal mechanics and removing the control element, then screw an adapter with an internal inch thread to one output and an adapter from 1 to 38 to the other.
Using an adjustable wrench, twist the adapters according to the scheme. Next, we mount the gearbox, pressure gauge, pressure switch and adapter on a flexible hose.
The next step will be to fasten the wheels to the chipboard sheet. Since the design will be two-level, you need to drill holes for the studs. After that, we put a fire extinguisher in its place.
In the case of using a hydraulic accumulator, the assembly scheme is even simpler, since it has brackets on top and bottom. Therefore, the lower fasteners are screwed to the base, and the upper ones are used to install the compressor.
In our case, the second floor needs to be built. For this, markings are made, holes are drilled, and the upper and lower floors are bolted together. Then the compressor is mounted on the second floor. Silicone gaskets are suitable for reducing vibration.
When installing the compressor, we put the washers. We fasten the air distribution module to the tank. Using a hose and clamps, we tightly connect the compressor outlet and the inlet of the air preparation unit.
Now it's time to work with the wiring diagram. A jumper setting would be appropriate. Also, protective elements do not interfere. The connection line must pass through the relay and switch. The connection itself will proceed as follows.
From the plug, the phase wire goes to the switch. Then it is connected to the desired relay terminal. If there is no ground wire, we put the zero wire on the relay ground terminal.
Already from the relay, the phase wire and the neutral wire go to the starting device of the compressor station drive and are connected according to the diagram to the necessary terminals. Next, we install a jumper on the terminal block of the starting device by soldering.
It will provide the connection of the windings to the phase. Cables can be laid in plastic ties. We check and run the installation. Then we paint it.
Want to know everything about car painting? Read more useful articles:
- . Everything about the case.
- . These tips are important.
- . Useful if you want to buy a car.
Currently, the industry offers some selection of compressors manufactured by it. True, the assortment is not too big. And there are a lot of drawbacks of such units. Therefore, you might think that a homemade compressor from the refrigerator is completely devoid of such drawbacks. And what - it really can be!
Compressor Materials
In order to independently make a compressor for the refrigerator you need, nothing at all. But the main component of a homemade refrigeration compressor will be the unit from a conventional refrigerator.
In addition, you will need:
- An automobile air filter that can work completely under any pressure
- Bypass valve, combined with a check valve, designed for a pressure of 6 atmospheres and used usually by plumbers
- Any synthetic hose that can withstand pressure of 6 atmospheres
- Copper connecting tubes
- Make a storage tank called a receiver. Moreover, the volume of the receiver should be provided so that the larger it is, the less equipment will be included in operation
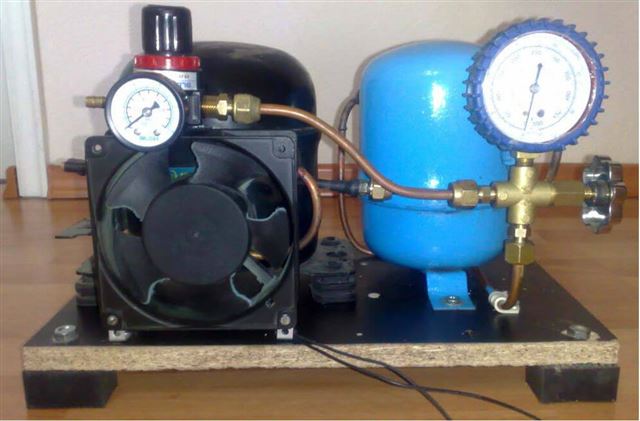
Remember that the accumulated air pressure in the receiver decreases as it is consumed. If the equipment will be used only for pumping tires, where the maximum allowable pressure should not exceed 3 atmospheres, then this is not very critical. But if the unit is designed to work with a pneumatic tool, then this can be very critical.
Where to begin?
And to start, as they say, it is necessary from the beginning. Namely - to make a tank. Its design should include 3 pipes:
- Output
- Input
- Designed to drain condensate
Helpful hints:
- When installing the compressor from the refrigerator with your own hands and the tank itself, the drain pipe should be located strictly below, so that the condensate drains without problems. A slight problem is possible with the unit itself. That is, he sometimes “wants” to get rid of oil. To avoid this, the outlet pipe must be bent upward at a certain angle
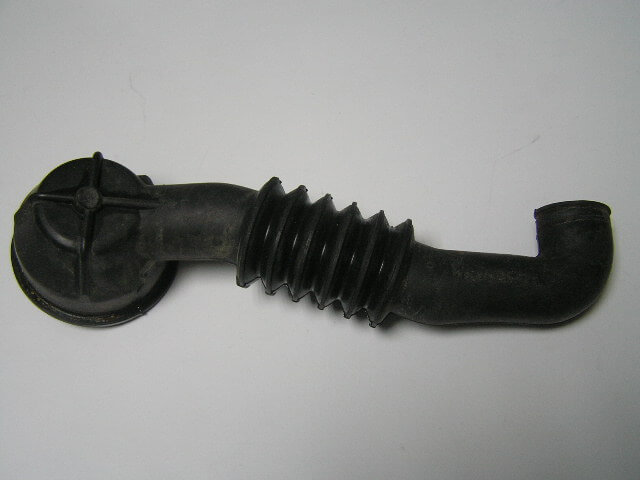
- By the way, the inlet pipe also needs to be bent exactly the same way, putting on it a rubber tube, the other end of which is connected to the air filter
- The bypass valve is necessary in order to prevent the movement of air in the opposite direction. In addition, when pressure reaches its maximum limits (more than 6 atmospheres), it simply opens and corrodes excess air
- As for the reliability of the unit, it is usually capable of producing at least 15 atmospheres, so there is no need to doubt its reliability. For safety reasons, it is recommended to turn off the shut-off valve at the outlet of the receiver, which can be used as any plumbing valve. While the receiver is filling with air, the tap can be shut off. As a matter of fact, the design of a home-made receiver can be absolutely anything and is limited solely by the imagination of the home-grown "designer"
![]()
- As a storage tank (receiver), craftsmen usually use used receivers from the KAMAZ brake system, since it already has all the necessary fittings. If there is no opportunity to find the old KAMAZ receiver, you can make it from an old fire extinguisher. But know that in this case you will have to work hard to weld the fittings and pipes correctly
- Some try to abandon the use of a large number of connecting tubes. However, such work is immediately doomed to failure. Oxygen hoses used in welding showed the best operational results, but their weight is quite large, and a compressor with similar nozzles is not very convenient in operation
- To start the finished assembled compressor into operation, it is necessary to provide a compressor start relay and add a switch
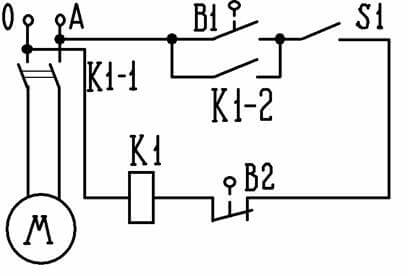
- The refrigeration compressor itself is recommended to be made on the frame and only on rubber cushions. If possible, it is advisable to install a pressure gauge in series with the non-return valve to monitor pressure. Although, in practice, craftsmen often act differently: they install a pneumatic pressure switch designed to disconnect the unit from the network. If you correctly adjust such a valve, the unit will turn off at the lower and upper thresholds of the pressure value
- It is also a good idea to provide a shutdown relay for overheating, so that accidental overheating of the equipment does not destroy the fruitful results of your work
What happens: general view of the compressor
In general, the scheme of a self-assembled and working compressor is planned as follows:
- Through the air filter and the pipe, the refrigeration compressor draws in street air
- An overflow valve is installed at the end of the inlet hose.
- At the outlet of the tank there is also a control valve.
- A hose ending in a pneumatic gun is connected to the control equipment itself
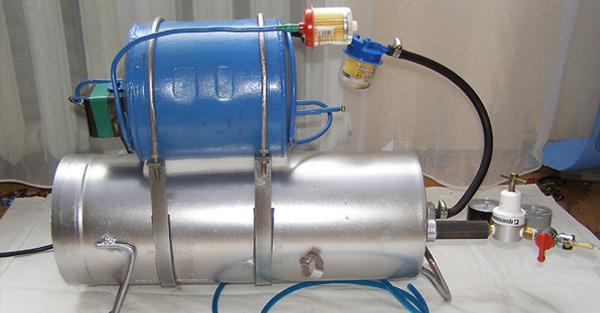
A garage compressor is the right equipment in your garage. With it, you can paint the car, inflate tires, supply air for the operation of pneumatic tools.
For this, certain requirements are imposed on them in order to create the desired air flow with the required pressure. How to make a compressor in the garage, introduces the proposed article.
An air compressor in the garage is always needed. It can be used both to blow off dust from the surfaces of abrasive parts and to obtain excess pressure in pneumatic tools.
Often, the compressor’s working life is necessary for car painting, which imposes certain requirements on the created air flow:
- The flow should go strictly evenly without any impurities in the form of droplets of liquid, oil or suspended solids. On freshly applied paintwork, graininess, cavities and shagreen are due to the penetration of foreign particles into the air stream.
- Uneven flow of the mixture leads to drips of paint and the appearance of dull spots on the enamel.
- Branded air compressors manufactured by the industry have all the features for this process, but are quite expensive.
- Not inferior to professional ones, you can create a product model yourself or use a compressor for a garage from a refrigerator.
- In this case, in a device for containing compressed air, which is called a “receiver”, overpressure occurs. The air flow can be forced manually and mechanically.
- Manual feed saves money, but it takes a lot of energy and effort to control the process.
- These shortcomings are eliminated by automatic pumping, but in this case the oil is manually replaced in the air pump.
- Then the compressed air is evenly fed through the outlet fitting to the actuators.
How to make a simple compressor from the refrigerator
The simplest compressor in the garage can be made from an old refrigerator.
To make it, you will need to purchase:
- The air filter from the car, designed for different pressures. Its price is quite small.
- Bypass plumbing valve, which can be restrictive and disruptive, combined with a check valve for six atmospheres.
- Any plumbing hose withstanding more than six atmospheres.
- Chinese gun without pressure gauge.
- Any capacity storage tank. The larger it is, the less often it will need to be included.
- From copper tubes connecting communications or hoses of any formation.
Tip: The cylinder is a battery for storing air. As you work, the pressure will decrease, which is not very important when inflating tires, where no more than three atmospheres are enough. But for a pneumatic tool, this will be insufficient and critical.
Instructions for the manufacture of the device are as follows:
- The tank is going. At least three nozzles are included in its device:
- input;
- day off;
- to drain condensate. The element is installed after mounting the container strictly below, so that the liquid is drained without problems.
- The problem with the compressor may be that it will spit out oil, so it is necessary to close the outlet pipe so that it is directed strictly up.
- In the same direction the hose should go to the tank.
- The intake pipe is bent upward and supplied with a short rubber tube, an air filter from the machine is mounted on its end.
- A return bypass water valve is placed between the cylinder and the compressor, which prevents the air from escaping back, and is the simplest indicator that the pressure has become a given value. When it reaches six atmospheres, it will begin to hiss, which means it's time to turn off the compressor engine.
Tip: A conventional refrigeration unit produces more than 15 atmospheres, so you should not be afraid of the engine. You can additionally increase safety by screwing a valve at the outlet of the cylinder, a plumbing fit. When filling the cylinder, the valve can be blocked.
- It gets together.
- The cylinder is strengthened.
- After starting the compressor, air will accumulate until the bypass valve is activated, in this case, stop supplying it by turning off the engine.
Tip: When operating such a compressor, it is impossible to move away from the device in order to monitor safety when it is turned on.
The disadvantage of this device is:
- In case of jamming of the valve, if it does not work, the compressor will burn out or something will burst. Therefore, a pressure gauge should be installed.
- It is necessary for control - any automation can break. To do this, it is recommended to leave a check / bypass valve in the system.
The entire assembly will look like this:
- Through the pipe, which is equipped with a filter, the compressor takes air.
- The outlet hose going to the tank is equipped with a check / bypass valve.
- At the outlet of the tank there is a control valve, and after it a shut-off valve is installed.
- At the bottom of the tank there is a pipe through which condensate drains.
- A hose goes from the control valves to the gun.
- The pressure switch closes and opens the contacts used to power the compressor by electric current.
The photo shows a compressor assembly diagram from an older refrigerator model.
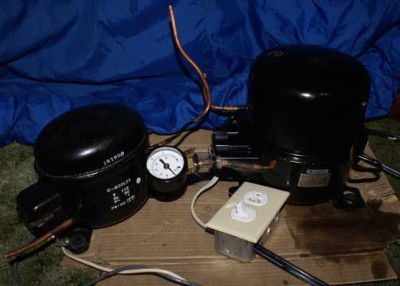
How to make a simple compressor for painting a car
To manufacture the device, you must purchase:
- Receiverwhich can be a car camera with or without a tire.
- Supercharger. For this, an automobile pump with a pressure gauge is used.
- Nipple from the old camera.
- Repair kit for rubber.
- Awl tailor.
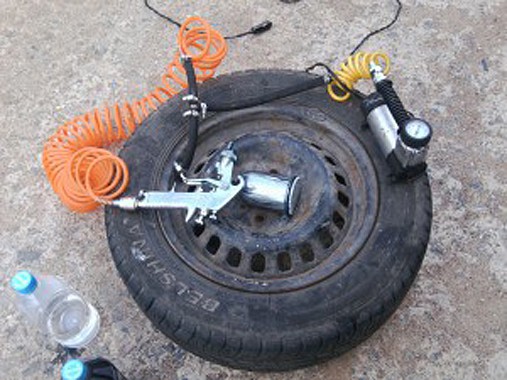
After preparing the necessary materials, you can proceed to the manufacture of the device.
For this:
- An unnecessary car camera is checked for leaks by pumping it with a pump. If the air holds, you can perform the next step. In the presence of leaks, places of damage are sealed or vulcanized with crude rubber.
- In the prepared receiver, a hole is drilled to install an additional nipple through which a stream of compressed air will exit evenly.
- An additional fitting is glued in and connected to the spray gun.
- In the remote control, a nipple is twisted for a free exit of air flow.
- In the native nipple of the camera for a car, the nipple remains and will work instead of the valve, holding excess pressure.
- Empirically determined in the receiver the desired level of air pressure. In this case, paint should be sprayed onto any surface. The enamel should lie down evenly, without jerking. The pressure gauge determines the amount of overpressure.
Tip: The only condition when using the device is to ensure that moisture or dust do not get into the camera, and then into the spray gun. Otherwise, everything will have to be done anew.
How to make a compressor from a vacuum cleaner, refrigerator or other devices will tell the video in detail.
For painting a car, as a rule, a device for spraying paint is used. This is an air compressor and a spray gun connected to it. If you are planning such equipment for your garage, you can make a compressor yourself or purchase a factory model.
It is obvious that buying a finished product is much easier. This entails less labor. However, self-manufacturing is a significant financial savings. In addition, experts say that a homemade powerful electric compressor for cars with a relay and receiver can be much more efficient and durable than a serial product. Below we will talk about how to make a compressor for painting a car under a voltage of 220V on its own.
Do-it-yourself compressor for painting cars
Obviously, for work we will need to collect certain materials. So, to assemble a home-made air compressor under voltage of 220V for painting a car, we need the following details:
- pressure gauge;
- gearbox with oil and moisture protection filter;
- pressure switch;
- cleaning filter for gasoline engines;
- crosspiece for water with a thread inside;
- threaded adapters;
- clamps;
- motor;
- receiver;
- engine oil;
- circuit breaker for voltage of 220V;
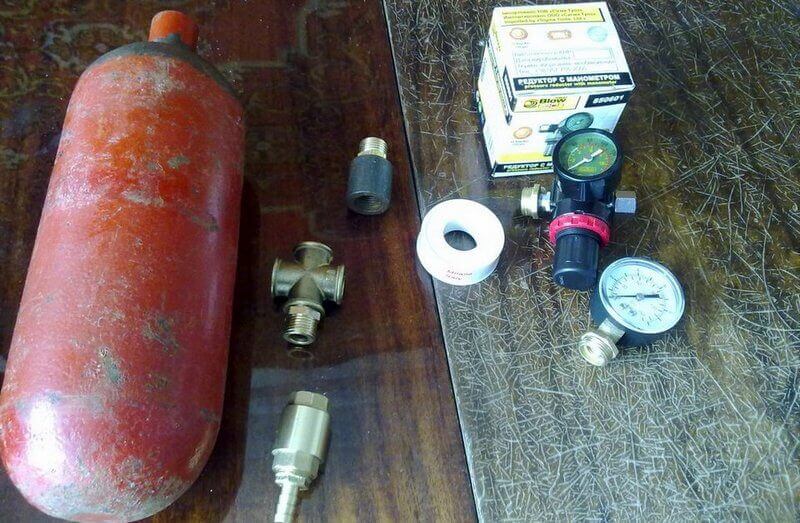 Materials for a homemade compressor
 - brass tubes;
- oil resistant hose;
- wooden plank;
- syringe;
- rust remover;
- studs, nuts, washers;
- sealant, fum tape;
- enamel for metal;
- file or file
- wheels from furniture;
- diesel engine filter.
Collecting this list is easy. After all the necessary is collected, we can get to work.
We assemble the engine
We start work with the most important element - the engine, which will create the desired amount of air pressure. Here we can use the motor from an unnecessary refrigerator.
Its device includes a relay, which will be needed in order to maintain a given value of air pressure. Experts say that the old Soviet models can achieve higher pressure than the new imported engines.
We remove the motor from the refrigerator, carefully clean it and treat it with a tool to avoid oxidation of the case. After that, he will be ready for painting.
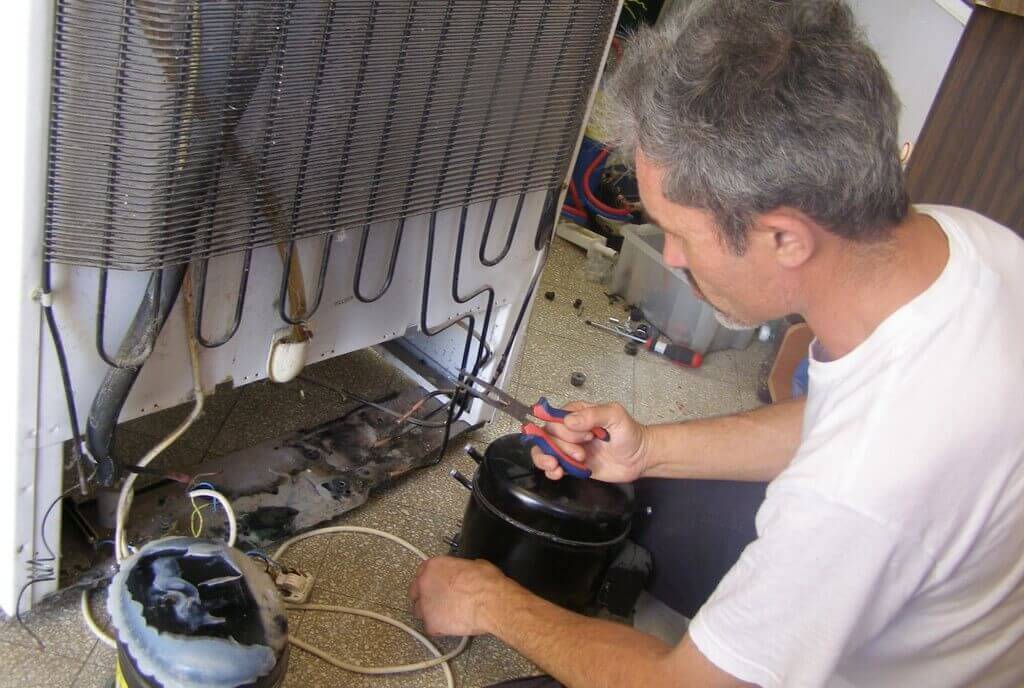 We remove the refrigerator motor
 Now it is necessary to make an oil change in the engine. For this, semi-synthetic is quite suitable - it is no worse than motor and has a lot of useful additives.
The motor has 3 tubes: 1 closed and 2 open, with which air circulates. In order to determine the input and output channels, turn on the motor and remember where the air comes in and where it comes from. A closed tube is used just to change the oil. When working with a file, we make a file in such a way as to avoid getting sawdust into the tube. Break the end, remove the oil and pour in a new one, using a syringe for this purpose.
To seal the channel after changing the oil, we select a screw with a suitable cross-section, wrap an airtight tape around it and screw it tightly into the tube.
We mount the motor together with the relay on a thick board, which will play the role of the foundation. We choose the position in which he was in the refrigerator. This is necessary because the start relay is extremely sensitive to how it is placed. It usually has a corresponding marking on it - stick to the correct location so that the relay works stably and correctly.
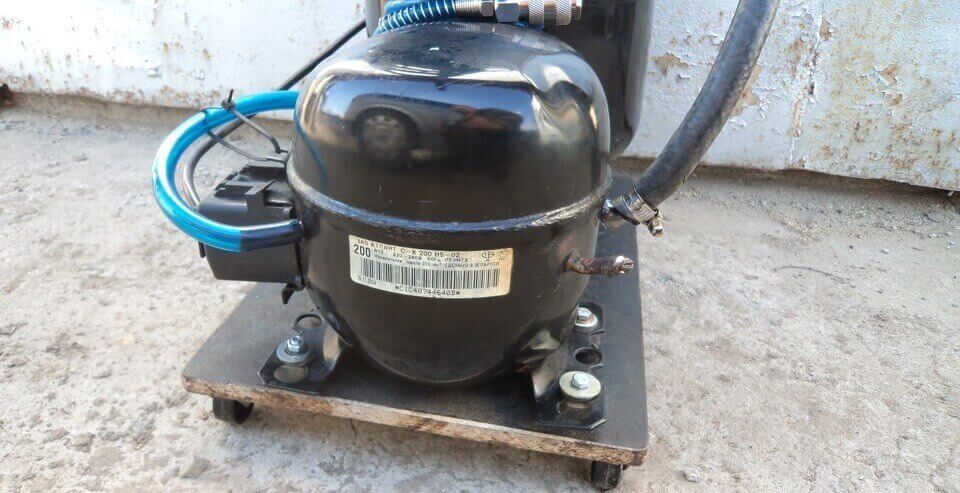 We mount the motor on a prepared board
 An air reservoir is a necessary element that is necessarily included in the compressor device. It must be designed for a certain amount of pressure in order for the device to work correctly. We can use as a receiver, old tanks from ten-liter fire extinguishers - they are durable and tight.
Instead of a start valve, we screw a threaded adapter onto the receiver - we use a special FUM tape for tightness. If the future receiver has foci of rust, they must be disposed of by grinding and processing with special tools. In order to eliminate the foci of corrosion inside, pour the product and shake it well. After we put a water cross with a sealant. We can assume that the homemade receiver is ready.
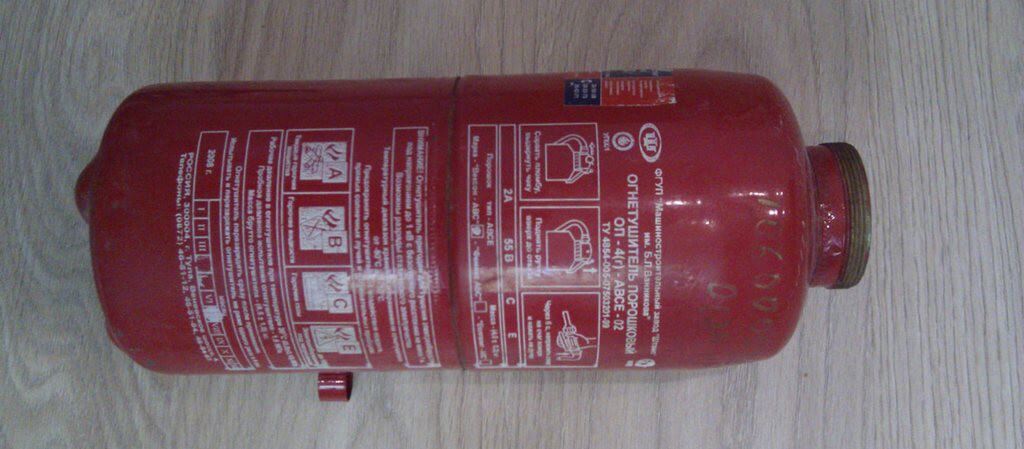 We use the old fire extinguisher as a reservoir for compressed air
 Putting the device together
We attach the receiver from the fire extinguisher along with the motor to the base of a thick board. As means of fixation, we use nuts, washers and studs. The receiver should be vertical. For its fastening we take three plywood sheets, in one of them we make a hole for the cylinder. The other two sheets are attached to a wooden base and plywood sheet, which holds a home-made receiver. At the bottom of the wooden base we wind the wheels of furniture fittings for better maneuverability of the mechanism.
We put a rubber hose on the compressor inlet pipe, to which we connect a cleaning filter for gasoline engines. Additional clamps are not needed, since the value of the inlet air pressure is relatively low. To avoid the presence of moisture and oil particles in the air stream, we put an oil-dehumidifying filter for diesel engines at the outlet. Here the pressure will be already quite high, therefore, special clamps with screw fasteners should be used for additional fastening.
The diagram below shows how to make a homemade automotive compressor for painting a car.
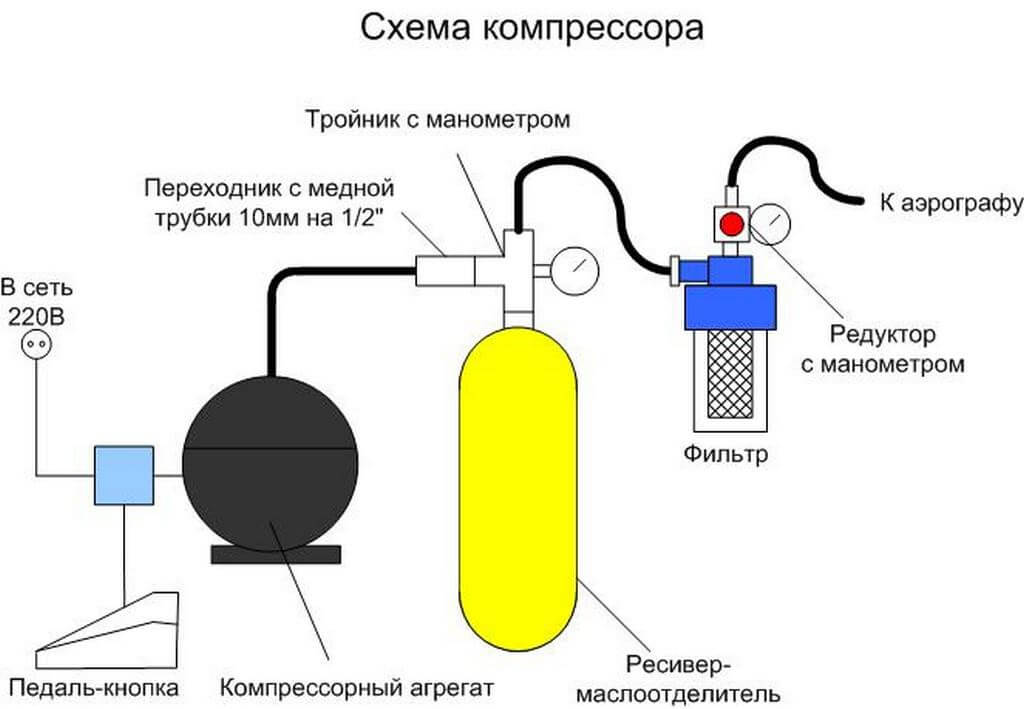 Compressor scheme for car painting
 Next, we connect the filter for cleaning from oil and moisture to the inlet of the gearbox, which we will need to decouple the pressure in the engine and cylinder. We make the connection on the plumbing cross on the left or right side. On the opposite side of the cross we put a pressure gauge to control the pressure level in the cylinder. We install a relay for adjustment on the upper end of the cross. All joints are sealed with sealant.
With the help of a relay, we can supply the pressure we need to the receiver, while ensuring the step-by-step operation of the mechanism. The relay is configured by two springs, one of which sets the upper pressure limit, and the second - the lower one. We connect one contact to the supercharger, the second commutes with the zero phase of the network. The second network input of the supercharger is connected by means of a toggle switch with the phase of the mains. The toggle switch will enable you to turn the device on and off from the power supply, without removing the plug from the outlet. We solder and isolate all electrical contacts. After painting, our homemade compressor for cars will be ready for testing.
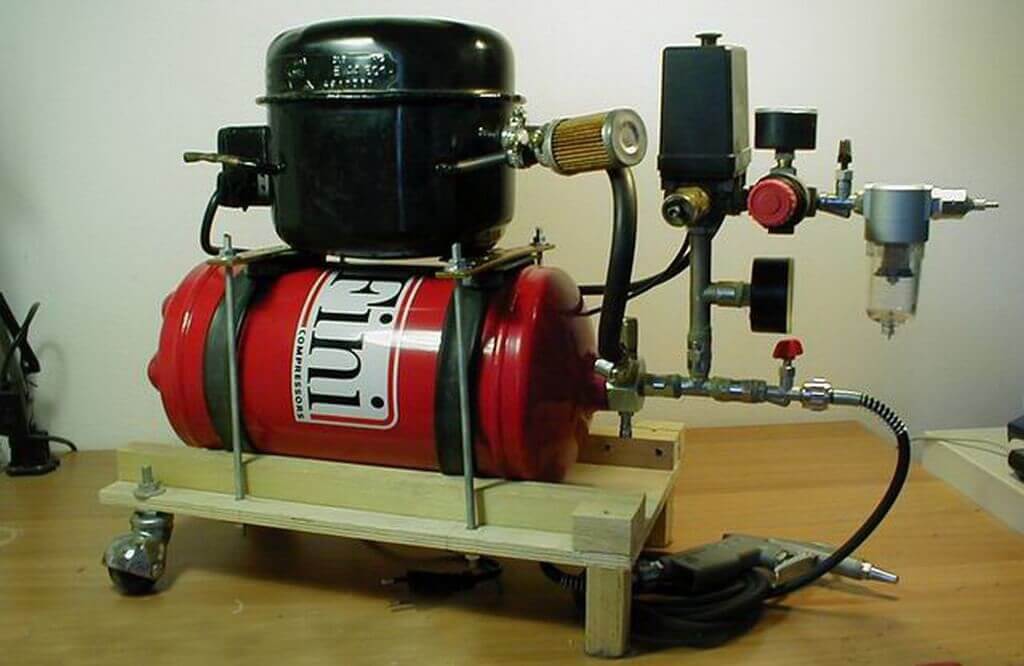 Homemade compressor for painting a car
 We test and configure a homemade compressor for painting cars
For testing, we connect the spray gun to the exit. We put the toggle switch in the off position and turn the plug into an electrical outlet. We set the relay controller to the smallest value and turn on the toggle switch. For control we use a manometer. We make sure that the relay is properly open at the right moments. Using water and detergent, we check how tight all the hoses and connections are.
Next, we release the tank from compressed air - after the pressure drops to a certain level, the relay should turn on the motor. If everything works fine, you can try to use the machine to paint a suitable object. We look at the quality and make sure that the device works stably, and it can be used to work with cars.
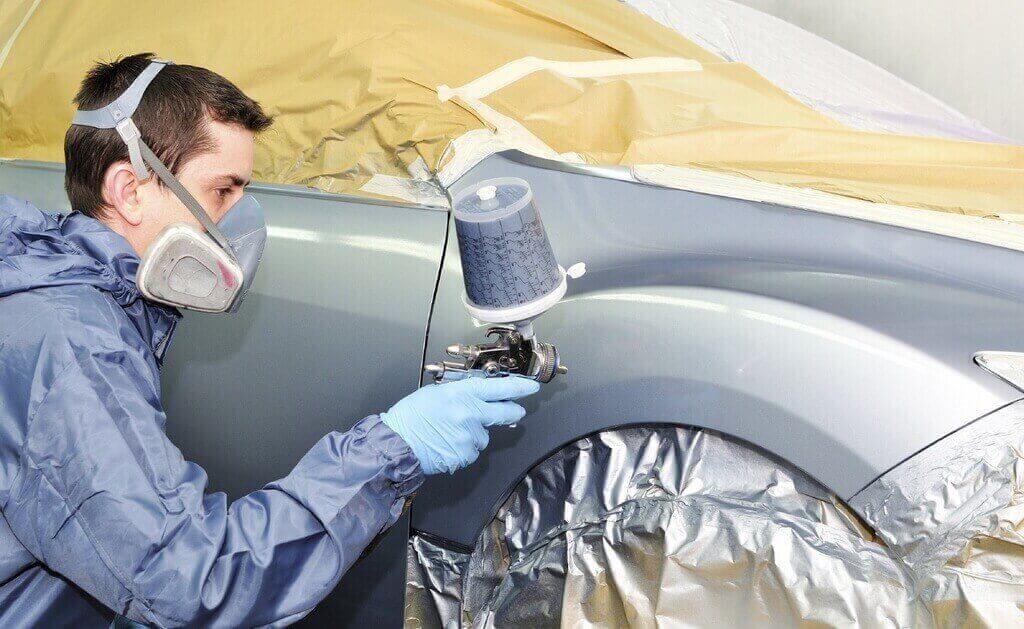 Checking the compressor with a spray gun
 Conclusion
Making an air electric compressor with your own hands not only helps to save money, but also allows you to create an aggregate for specific tasks. You can use it not only for painting the car body. It can be useful for sandblasting various elements of a car, as well as for blowing different elements and other tasks that require the use of compressed air.




The best material for car trim
Principles of hardening the body
Do-it-yourself compressor - with minimal scrap costs
Which is better: do-it-yourself or factory-made compressor for painting a car
Causes of fuel pump malfunctions